Imagine having a small robotic dog on your desk that you can assemble, program, modify, and teach new behaviors without needing access to an expensive robotics laboratory. That is the exciting idea behind Mini Pupper, an open-source quadruped robot designed to make hands-on robotics more accessible to students, developers, researchers, and electronics enthusiasts. Instead of purchasing a sealed commercial robot and being limited to the manufacturer’s features, makers can explore the hardware, study the software, and experiment with their own improvements. The project combines mechanical engineering, embedded computing, electronics, and robotics software in one compact platform. For anyone interested in building robots at home, Mini Pupper offers a practical way to move beyond watching robotics demonstrations and start understanding how those machines actually work.
Mini Pupper is particularly interesting because quadruped robots are considerably more complex than they appear. A robot dog must coordinate several joints, manage its center of gravity, calculate foot positions, and adjust its movements to remain stable. Even a basic walking sequence involves careful timing and coordination between motors. By putting these challenges into a relatively small, maker-oriented platform, Mini Pupper gives you an opportunity to explore concepts that also appear in much larger research robots. You can start with simple movement commands, then gradually investigate inverse kinematics, gait generation, sensor integration, and autonomous behavior. Its open-source approach makes it a compelling project for anyone who wants to understand the engineering behind modern robotic animals rather than simply operate one.
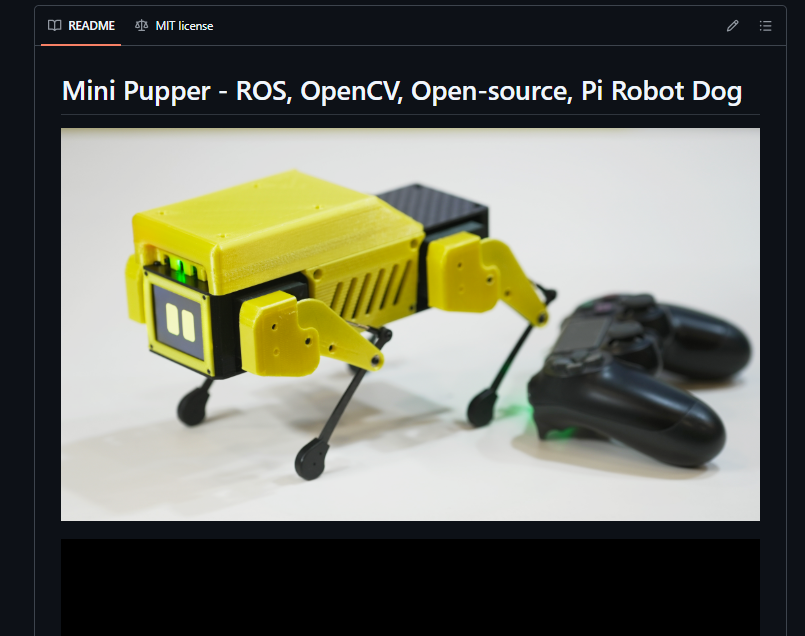
The Idea Behind an Affordable Quadruped Robot
Quadruped robotics has traditionally been associated with university laboratories, research institutions, and expensive commercial development platforms. Mini Pupper helps bring this technology closer to the maker community by providing a compact robot design that people can study and build themselves. Its educational value comes from the opportunity to experiment with real hardware while learning the mathematics and software behind locomotion. A student can examine how changing a joint angle affects a leg, while an electronics hobbyist can explore motor control and power distribution. A software developer can investigate how high-level commands become coordinated physical movements. These activities transform robotics from an abstract subject into a collection of practical engineering problems that can be tested, measured, and improved.
Why Open-Source Robotics Matters
Open-source hardware and software encourage people to learn by examining existing designs, adapting components, and sharing improvements. With a project such as Mini Pupper, the source repository can serve as a starting point for understanding how the robot is structured and how its software components interact. Rather than beginning with an empty CAD file or writing every control algorithm from scratch, a beginner can study the existing implementation and make small, manageable changes. More experienced developers can investigate alternative sensors, experiment with different gait algorithms, or create additional software modules. However, open-source does not automatically mean that every component is free or that assembly requires no technical experience. You still need suitable hardware, compatible parts, and the patience to troubleshoot mechanical, electrical, and software problems.
Key Features of Mini Pupper
Mini Pupper brings several important robotics concepts together in a compact platform. Depending on the version and installed modules, its capabilities can include programmable leg movement, embedded computing, camera-based perception, and integration with the Robot Operating System (ROS). The official documentation describes multiple generations of the platform, including Mini Pupper 1, Mini Pupper 2, and an AI Kit introduced in 2026. This means you should check which hardware version a tutorial covers before buying components or copying installation instructions.
Raspberry Pi and Embedded Computing
The Raspberry Pi acts as the robot’s computing platform in supported configurations, running software that coordinates movement and communicates with other components. Think of it as the robot’s brain: it receives commands, processes sensor information when available, and helps translate software instructions into physical actions. The exact board depends on the Mini Pupper generation, so it is important to follow the matching hardware guide rather than assuming that every version uses the same Raspberry Pi model.
3D-Printable Design and Customization
One of the most appealing aspects of a DIY robot dog is the opportunity to understand and modify its physical structure. Mini Pupper’s open hardware resources include mechanical design information, and the project documentation provides assembly guidance for the robot’s components.
For makers who own a 3D printer, this creates opportunities to learn about printed mechanical parts, tolerances, fasteners, and design iteration. You could investigate custom covers, camera mounts, cable guides, or protective accessories, provided your modifications preserve the required clearances and structural strength. However, do not assume every part should be printed in ordinary PLA or that every generation uses identical files. Load-bearing joints and motor mounts need particular care because poor fit or weak parts can interfere with movement and damage expensive servos. The best approach is to begin with the documented design, assemble it correctly, and then make changes one at a time.
Walking, Balance, and Quadruped Movement
A robot dog looks simple when it takes a few steps, but its movement depends on coordinated actions across multiple joints. The original Mini Pupper project describes a 12-degree-of-freedom configuration, with individual servos controlling the robot’s joints. It also discusses gait patterns such as the trot, pace, and bound.
Each gait changes the order and timing in which the legs move, creating different patterns of support and motion. A trot, for example, coordinates diagonal pairs of legs, while a pace moves the legs on the same side in coordinated pairs. Experimenting with these patterns can help you understand gait planning, joint limits, timing, and the relationship between stability and speed. Just remember that the ability to execute a programmed gait does not automatically mean a robot can maintain balance on every surface or recover from every disturbance. Real-world performance depends on calibration, control algorithms, mechanical condition, and the environment.
How Mini Pupper Works
Mini Pupper operates through a combination of mechanical joints, actuators, computing hardware, and control software. When you issue a movement command, the software determines the intended action and coordinates the required joint positions. The control electronics then send suitable signals to the servos, which rotate the joints and move the legs. Depending on the hardware configuration, sensors can provide additional information about the robot’s orientation or surroundings. The result is a continuous interaction between software and physical motion. Understanding this process is one of the project’s biggest educational benefits: instead of treating the robot as a mysterious device, you can trace how a command becomes a movement and identify which part of the system needs attention when something goes wrong.
Motors, Sensors, and Control Systems
The servos are essential because they convert electrical commands into joint movement. In the original 12-DOF design, the robot uses coordinated servo control to move its four legs. An inertial measurement unit, or IMU, can provide information about orientation and motion in supported configurations, while a camera or LiDAR module can expand the robot’s ability to perceive its environment. The available sensors depend on the particular model and accessories, so confirm the bill of materials before planning a project.
From an engineering perspective, this creates several opportunities for experimentation. You can study how servo calibration affects foot placement, how joint limits influence movement, and how sensor readings can help estimate the robot’s state. You can also investigate power consumption and signal timing. These are practical lessons in embedded control that are difficult to gain from software simulations alone.
ROS and Robot Software
The Robot Operating System, commonly called ROS, is a software framework that helps robotics developers organize programs into communicating components. Despite its name, ROS is not a conventional operating system like Windows or Ubuntu. It provides tools, libraries, communication mechanisms, and conventions that help different parts of a robot exchange information. Mini Pupper’s software ecosystem includes ROS-based projects, with ROS 2 support documented in dedicated repositories. One available ROS 2 project specifies Ubuntu 22.04 and ROS 2 Humble for its documented setup, illustrating why matching software versions matters.
Tiryoh/mangdang_mini_pupper_ros · GitHub
Using ROS, you can explore topics such as publishing velocity commands, monitoring joint states, visualizing robot models, and connecting navigation components. You do not need to master every part of ROS before getting started. Begin with the installation guide for your specific version, verify that the software communicates correctly, and then introduce more complex packages as your understanding grows.
AI, Computer Vision, and Autonomous Robotics
The most exciting possibilities emerge when Mini Pupper moves beyond manually commanded walking and begins responding to information from its environment. With compatible camera hardware and software, you can explore computer vision using OpenCV, a widely used library for image processing and visual analysis. A camera-based experiment might detect a colored object, recognize a visual marker, or estimate where an object appears in the image. More advanced projects can investigate object detection and vision-guided behavior, although the practical performance depends on the available processor, camera, model size, and lighting conditions. The official Mini Pupper documentation describes camera-based vision tutorials and AI-related capabilities, while its optional modules explain how hardware choices affect the available features.
Navigation adds another layer of complexity. A robot needs a way to represent its surroundings, estimate its position, and decide how to move toward a destination. Simultaneous localization and mapping, known as SLAM, is a robotics technique that combines localization and map-building. Mini Pupper’s documented ecosystem includes ROS navigation resources and LiDAR-related options for compatible configurations.
You could use simulation to learn how mapping works before attempting experiments with physical hardware. You might also create a simple behavior in which the robot detects an object and stops, or use a joystick to command movement while viewing sensor data on a laptop.
AI does not automatically make the robot independently intelligent, though. A language model, image classifier, or object detector is only one component in a larger system. Reliable autonomous behavior also requires suitable interfaces, motion control, safety limits, and testing. The most effective learning path is to build one capability at a time and measure how well it works under different conditions.
Hardware Requirements and Components
Before starting a Mini Pupper build, identify the exact hardware generation you intend to assemble. This matters because the Raspberry Pi model, control board, servos, mechanical components, and software requirements may differ between versions. The official documentation includes hardware information, assembly instructions, and optional modules, making it a useful starting point for preparing your shopping list.
A typical build may require the following components, depending on the selected version:
| Component | Purpose |
|---|---|
| Compatible Raspberry Pi or specified computing board | Runs the robot’s software |
| Servo motors | Control the leg joints |
| Servo controller and control electronics | Coordinate motor commands |
| Main body and leg components | Provide the mechanical structure |
| Battery and power circuitry | Supply portable electrical power |
| MicroSD card | Stores the operating system and software |
| IMU, where supported | Measures orientation and motion |
| Compatible camera module | Enables computer vision experiments |
| Optional LiDAR module | Supports compatible mapping and navigation projects |
| Fasteners, cables, and connectors | Secure and connect the assembly |
The table is a planning guide, not a universal bill of materials. Before purchasing anything, compare the components against the instructions for your selected model.
Power deserves special attention. Multiple servos can draw significant current, especially when the robot starts moving, changes direction, or encounters resistance. A power supply that works for the Raspberry Pi alone may not be sufficient for the complete robot. Follow the manufacturer’s electrical specifications, use the recommended battery and power circuitry, and check connector polarity before switching on the system. Never assume that a connector is safe simply because it physically fits.
You should also prepare a computer for software development, a reliable way to access the robot over a network, and basic tools for assembly. A soldering iron may be useful for certain custom modifications, but follow the official instructions before deciding whether soldering is necessary. If you are new to robotics, assemble the standard configuration first. Once the robot works reliably, you can experiment with new sensors, redesigned parts, and additional computing modules.
How to Build Your Own Mini Pupper
Building Mini Pupper is an opportunity to learn through a real engineering project rather than following isolated tutorials. The best approach is to divide the process into manageable stages: verify the parts, assemble the mechanical structure, configure the electronics, install the software, calibrate the joints, and test movement. The project’s official documentation provides assembly and calibration resources to help guide these steps.
Assembly, Wiring, and Software Setup
Step 1: Review the documentation. Visit the Mini Pupper QuadrupedRobot GitHub repository and identify the instructions relevant to your hardware. Check the bill of materials and mechanical resources before purchasing parts. If you are using a newer version, consult the official Mini Pupper documentation as well.
Step 2: Assemble the mechanical structure. Follow the model-specific instructions to install the servos, legs, body panels, and fasteners. Pay attention to the orientation of each motor and joint. A single incorrectly positioned servo can make calibration difficult or cause a leg to move in the wrong direction. Avoid overtightening screws, and keep cables away from moving joints.
Step 3: Connect the electronics. Install the computing board, motor-control electronics, battery, and any supported sensors according to the wiring diagram. Check every connector before applying power. Ensure that the wiring is secure and that moving legs cannot pull on cables.
Step 4: Install the software. Prepare the operating system and development environment specified for your model. Some ROS 2 guides use Ubuntu 22.04 and ROS 2 Humble, but older configurations may require different software. Do not combine instructions from different hardware generations without checking compatibility.
Step 5: Calibrate the joints. Calibration helps ensure that the servos correspond to the intended joint positions. Incorrect calibration can lead to awkward movement, mechanical strain, or collisions between parts. Follow the recommended procedure and keep the robot supported while testing unfamiliar movements.
Step 6: Perform a controlled movement test. Start with basic commands and low-risk tests in a clear area. Confirm that each joint responds correctly before attempting a complete walking sequence. If a servo overheats, a leg binds, or the power system behaves unexpectedly, stop and investigate the cause rather than repeatedly restarting the robot.
The key lesson is simple: successful assembly is not just about making the robot look complete. Every mechanical joint, electrical connection, and software component must work together.
Programming Mini Pupper with Python and ROS
Once the robot is assembled and calibrated, programming becomes the gateway to customization. Python is a useful starting language because it is approachable for beginners and widely used in robotics tooling, automation, and computer vision. You can begin by understanding how commands are issued, how configuration values affect movement, and how software communicates with the robot’s control system. From there, you can explore ROS nodes, topics, messages, and launch files.
For example, a beginner project might involve sending a supported movement command from a keyboard or joystick. The next stage could be a program that moves the robot forward for a limited period, pauses, and then turns. Later, you might connect a camera to detect a colored object and trigger a predefined behavior when that object appears. Each project builds on a different part of the system, giving you a structured way to learn rather than trying to implement a complete autonomous robot immediately.
The ROS 2 ecosystem provides additional development tools. A compatible setup can allow you to visualize the robot model in RViz or experiment with simulated movement in Gazebo. These tools are particularly useful when testing ideas that would otherwise require repeated physical trials. The Tiryoh ROS 2 repository documents setup and simulation workflows for a specified software environment, including Ubuntu 22.04 and ROS 2 Humble.
You can explore the relevant code here:
- Mini Pupper QuadrupedRobot — the repository highlighted in this article.
- Mini Pupper ROS 2 — ROS 2 packages and development resources.
- Mini Pupper Jupyter Notebooks — notebooks and workshop-related learning materials.
Check the README files, branch names, licenses, and dependency requirements before running commands. Different repositories can target different robot generations, so not every example will work on every unit.
Mini Pupper for Students, Makers, and Researchers
Mini Pupper can be useful for a wide range of learners because it combines physical engineering with software development. For students, it offers a practical way to connect classroom subjects such as geometry, physics, programming, and electronics. For hobbyists, it creates a project that can grow from simple motor experiments into more advanced robotics. Educators can use quadruped movement to introduce concepts such as coordinate systems, sensor feedback, and control algorithms. Researchers and experienced developers can investigate gait planning, embedded computing, computer vision, and ROS-based development, subject to the capabilities of their hardware configuration. The project is especially attractive to people who prefer to learn by building something they can see and interact with.
If you are an electronics enthusiast, you can investigate power distribution, servo control, and sensor interfaces. If you enjoy software, you can experiment with Python, ROS, simulation, and computer vision. If you own a 3D printer, you can explore mechanical design and custom accessories. The interesting part is how these skills overlap. A change in the robot’s physical geometry may require a change in its movement calculations, while adding a camera introduces new software and processing requirements. That interconnectedness reflects how real robotics teams work, making Mini Pupper a valuable learning platform for aspiring engineers.
Advantages and Limitations of Mini Pupper
Before investing in a robot dog, consider both its strengths and the practical challenges involved. Mini Pupper’s major advantage is that it gives you access to an open-source quadruped platform with resources for mechanical assembly, software development, and robotics experimentation. Its educational potential extends beyond walking because compatible configurations can support further work with ROS, cameras, and navigation-related components.
However, open-source hardware still requires time, money, and troubleshooting. The final cost depends on the hardware version, component sourcing, optional sensors, replacement parts, and tools you already own. Calibration can be challenging for first-time builders, and robotics software frequently requires careful management of operating-system and package versions. A compact quadruped also has physical limitations: battery life, payload capacity, computing performance, and stability depend on its design and configuration.
| Advantages | Limitations |
|---|---|
| Open-source learning resources | Requires assembly and configuration |
| Hands-on quadruped robotics | Joint calibration can be challenging |
| Customization opportunities | Modifications may require new testing |
| ROS and programming experiments | Software compatibility must be checked |
| Optional vision and navigation extensions | Extra sensors may increase cost |
| Useful for STEM and maker projects | Not a substitute for industrial robot hardware |
The best way to approach these limitations is to start with a documented configuration and expand only when you understand the existing system. You do not need to add every available sensor or AI feature on day one. A reliable walking robot is a much better foundation than a complicated robot that cannot complete a basic movement test.
Where to Find Mini Pupper and Its Source Code
If you want to explore the project, start with the GitHub repository featured in the original post.

Mini Pupper QuadrupedRobot
Open-source robotics project
Explore the repository, review the available source code, and investigate its documentation and linked resources before starting a build.

Official Mini Pupper Documentation
Assembly, calibration, and development
Use the documentation to identify the appropriate hardware version, follow assembly instructions, and learn about supported software features.
The original repository includes references to assembly, software installation, calibration, and mechanical design resources.
Read those materials before ordering parts, and check whether the instructions correspond to your intended version. You can also explore the ROS 2 repository if your goal is to learn about simulation, robot visualization, and software-based movement control.
If you are sharing this project with a robotics community, university club, or maker group, consider treating it as a collaborative build. One person can handle mechanical assembly, another can work on the electronics, and another can investigate software. This division of tasks helps everyone contribute while learning how the subsystems fit together.
Conclusion: Build Your Own Open-Source Robot Dog
Mini Pupper demonstrates how open-source hardware and software can make advanced engineering concepts more approachable. By combining a quadruped mechanical design with embedded computing and robotics software, it offers a hands-on way to explore everything from servo calibration to computer vision and autonomous navigation. You can start with the fundamentals, learn how coordinated leg movement works, and gradually develop more sophisticated behaviors as your skills improve.
For students, electronics enthusiasts, 3D-printing makers, and aspiring roboticists, the most valuable part is not simply watching a tiny robot walk. It is understanding the engineering that makes the movement possible and having the freedom to experiment with it. You can study the source code, adapt the design, investigate new algorithms, and share your own improvements with other builders.
Ready to start building? Explore the Mini Pupper GitHub repository, check the relevant documentation, and choose a project that matches your current skills.
Build it. Code it. Customize it. Take your first step into quadruped robotics!
Frequently Asked Questions (FAQs)
1. What is Mini Pupper?
Mini Pupper is a compact, open-source quadruped robot dog designed for education, experimentation, and robotics development. It combines programmable leg movement with embedded computing and software resources that can help users explore robotics, depending on the hardware version.
2. Does Mini Pupper use a Raspberry Pi?
Supported Mini Pupper configurations use Raspberry Pi computing hardware, but the exact board depends on the generation. Check the official documentation to confirm the requirements for your selected model.
3. Can beginners build Mini Pupper at home?
Yes, beginners can use the project as a learning experience, provided they follow the appropriate assembly instructions and allow time for troubleshooting. Basic familiarity with electronics and programming can help, but you can develop those skills as you progress through the build.
4. Can Mini Pupper run ROS and AI applications?
The Mini Pupper ecosystem includes ROS and ROS 2 resources, as well as camera-based computer vision and AI-related learning materials. Actual capabilities depend on the hardware, installed sensors, software version, and computational resources. Consult the documentation before attempting a specific application.
5. Where can I download the Mini Pupper source code?
You can access the repository directly here: https://github.com/Tiryoh/MiniPupper-QuadrupedRobot. Review its README, available documentation, and linked component resources to understand how to assemble and configure the robot.