1. What Is the Sesame Robot Micro?
Imagine building a tiny robotic dog that can walk on four legs, perform entertaining movements, display expressions on a digital face, and respond to commands sent from your phone. You might expect a project like this to require expensive robotics equipment or advanced engineering skills, but the open-source Sesame Robot Micro project makes this kind of experiment much more accessible to electronics enthusiasts, makers, students, and hobbyists. Created by Dorian Todd, the project combines a microcontroller, servo motors, an OLED display, and a custom-designed 3D-printed body to create a compact quadruped robot. Instead of simply moving forward and backward, the robot can perform different poses and animations, making it feel more like a small mechanical pet than a conventional electronics project.
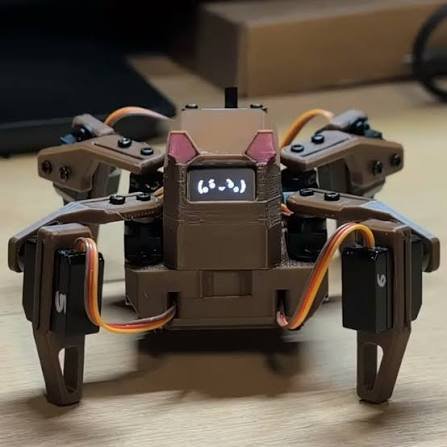
The project has attracted attention because it brings together several exciting areas of modern DIY technology: ESP32 robotics, 3D printing, embedded programming, Wi-Fi communication, and animated interfaces. Its open-source approach allows builders to examine the firmware, explore the hardware designs, and experiment with their own modifications rather than treating the robot as a closed commercial product. The dedicated Sesame Robot Micro GitHub repository contains CAD files, printable models, and firmware for the main controller and Wi-Fi bridge. The developer describes this smaller version as an experimental project, so builders should expect some rough edges and be prepared to troubleshoot.
2. Why This DIY Robot Dog Is Getting Attention
Robotics is becoming more approachable because affordable microcontrollers, desktop 3D printers, and open-source software allow people to build machines that once required specialized equipment. A small quadruped robot is an especially interesting project because it combines mechanical design with electronics and software in one compact package. You need to think about how the legs move, how the motors receive commands, how the robot maintains a stable pose, and how the control software coordinates every action. The result is a hands-on learning experience that goes far beyond uploading a simple blinking LED program to a development board.
The Sesame family of projects also demonstrates how a robot can communicate through movement and visual expressions. Instead of relying exclusively on sensors or a complicated artificial intelligence model, the robot can use programmed poses and animations to create expressive behavior. A wave can look like a greeting, a resting pose can suggest that the robot is relaxing, and a dance sequence can make it entertaining to watch. The combination of a physical body and a digital face makes the project useful for robotics demonstrations, maker workshops, school exhibitions, and personal experimentation. Best of all, you can use the open-source designs as a starting point and gradually develop your own version.
3. Eight Servo Motors and Four Moving Legs
The robot uses eight servo motors, with two motors associated with each leg. This arrangement provides multiple axes of movement and allows the controller to coordinate the legs into different poses. Unlike a simple wheeled robot, a quadruped must manage the position of several joints to produce a useful walking motion. Each servo receives a control signal that tells it which angular position to move toward, and the firmware coordinates these positions to create sequences such as walking, turning, standing, and dancing.
Servo calibration is important because the robot’s physical movement depends on the relationship between each motor’s commanded angle and the actual position of its joint. If one servo is installed in the wrong orientation or connected to the wrong output, the robot may move awkwardly, collide with its frame, or struggle to stand. The project therefore benefits from careful mechanical assembly and testing before attempting complex animations. Builders should follow the instructions for the exact hardware version they choose, because pin assignments, controller boards, and wiring arrangements can differ between versions.
4. An OLED Display That Gives the Robot Personality
One of the most appealing features is the small OLED screen mounted on the robot’s body. Instead of using the display only for numerical readings or debugging messages, the firmware can render expressive facial graphics. The screen can help the robot appear happy, curious, sleepy, or surprised, depending on the expressions and animations implemented in the software. This small addition changes the overall experience because it gives the machine a recognizable personality, even though its behavior is driven by programmed instructions rather than human-like emotions.
The display also offers an opportunity to experiment with graphics programming on an embedded device. Builders can learn how a microcontroller sends data to an OLED over an I²C connection, how bitmap graphics are drawn, and how the screen can update while the servos are moving. You could modify existing facial expressions, design new pixel-art eyes, or synchronize visual reactions with particular movement commands. For example, the robot might display a cheerful face when a dance begins and switch to a resting expression when it stops. These additions are relatively small software projects, but they can make a DIY robot considerably more engaging.
5. Hardware and Components Required
Before starting, review the repository’s bill of materials and select the hardware configuration that matches the build guide you intend to follow. The broader Sesame Robot project documents a build using eight 180-degree MG90S micro servos, a compatible ESP32 controller, a 128 × 64 SSD1306 OLED display, connecting wires, a power switch, and a suitable power supply. It also includes different controller and distribution-board options, so you should not assume that every Sesame variant uses exactly the same hardware. The smaller Micro repository has its own firmware architecture, including a separate Wi-Fi bridge based on a Seeed XIAO ESP32-C6, which means its component list and wiring must be checked independently.
| Component | Purpose |
|---|---|
| Compatible ESP32-based controller | Executes the robot’s control firmware |
| Eight compatible servo motors | Move the four legs and joints |
| 128 × 64 OLED display | Shows animated facial expressions |
| 3D-printed body parts | Form the frame, legs, joints, and covers |
| Servo wiring and connectors | Carry motor control and power connections |
| Regulated power supply | Powers the controller and servos |
| USB data cable | Connects the controller to a computer for programming |
| Screws, servo horns, and small hardware | Secure the mechanical assembly |
| Soldering tools and basic hand tools | Support wiring and assembly |
The precise components depend on whether you are building the Micro version or the better-documented main Sesame robot. Check the relevant bill of materials before purchasing anything, particularly the controller, servo type, power hardware, and connectors.
6. ESP32 Controller and Electronics
The ESP32 is a popular microcontroller platform for DIY robotics because it combines programmable control with wireless connectivity on supported models. It can execute movement commands, coordinate servo positions, communicate with an OLED display, and exchange instructions with a phone or computer. In this project, the electronics form the bridge between the software and the robot’s physical behavior: a command arrives, the firmware interprets it, and the controller sends the appropriate signals to the motors and display.
It is important to distinguish between the controller used by the main Sesame project and the controller used by the Micro project’s Wi-Fi bridge. The Micro repository identifies a Seeed XIAO ESP32-C6 for the bridge firmware, which provides a wireless access point, a web control interface, and serial communication with the main board. This does not mean that you can replace every controller in the build with any ESP32 board without changing the firmware. Pin mappings, available interfaces, power requirements, and communication connections must match the design you are following.
Power deserves particular attention. Eight servos can draw substantial current when starting, changing direction, or resisting a load, so a computer’s USB connection should not automatically be treated as a suitable power source for the complete robot. Use the power arrangement specified in the build documentation, check the voltage and current requirements, and ensure the controller and servo electronics share the required ground reference. Incorrect wiring or an undersized supply can cause resets, erratic movement, or overheating.
7. 3D-Printed Frame and Mechanical Assembly
The body is another major attraction of this project. Instead of requiring a custom-machined metal chassis, the design uses printable components to create the main frame, joints, legs, and covers. You can download the available STL files and print the parts on a compatible desktop 3D printer. PLA is used in the documented main Sesame build, although print orientation, settings, and support requirements should be checked against the supplied printing instructions rather than assumed to be identical for every component.
A successful print is only the beginning. The servo mounts must fit properly, screw holes must remain usable, and moving joints need enough clearance to travel without rubbing against adjacent parts. When assembling the robot, route wires away from moving joints and avoid tightening screws so aggressively that they damage the plastic. If you are designing your own modifications, consider how the additional weight affects motor performance and how the geometry changes the range of movement. A carefully assembled frame helps the robot move more consistently and makes later maintenance easier.
8. How the ESP32 Controls the Robot
At the heart of the robot is a simple but powerful idea: the software turns high-level commands into coordinated physical movement. When you request a forward walk, the firmware selects a sequence of servo positions designed to move the legs through a repeating pattern. When you select a dance, it runs a different sequence of poses. The robot’s apparent intelligence comes partly from how these movements are combined, timed, and presented through the OLED display. You can think of the ESP32 as the conductor of a small mechanical orchestra, coordinating multiple motors so that they work together instead of independently.
The Micro project separates the control system into two firmware components. The main-board firmware handles servo movements, poses, OLED expressions, and command parsing, while the Wi-Fi bridge firmware runs on the XIAO ESP32-C6 and forwards commands to the main controller. The bridge exposes a web interface and HTTP endpoints that allow a connected device to request actions without directly controlling every servo. This arrangement also creates opportunities for programmers to explore serial communication, embedded web servers, and basic client-server architecture.
This architecture is useful for learning, but it is not the same as a complete autonomous robot. Programmed animations do not automatically give the machine the ability to understand its surroundings, recognize obstacles, or navigate a room independently. Those features would require suitable sensors and additional software. The existing control system is an excellent foundation for experimentation, while more advanced capabilities can be developed as separate projects.
9. How to Download the Open-Source Files
Getting started is straightforward if you use the official project repository rather than downloading files from an unknown source. The Micro repository includes hardware design files, printable STL exports, the main-board firmware, and the Wi-Fi bridge firmware. Reviewing these folders before buying components helps you understand the project’s structure and identify which parts you need. You can also inspect the README to understand the intended hardware configuration and the project’s experimental status.
Follow these steps to find the files:
- Open the Sesame Robot Micro GitHub repository.
- Read the README and review the hardware and firmware directories.
- Open
hardware/STL/to find the printable model exports. - Inspect
hardware/CAD/if you want to examine or modify the available CAD designs. - Open
main-board-firmware/for the main robot controller code. - Open
wifi-bridge-firmware/for the wireless controller firmware.
The repository is available for public inspection, but you should check the current license and any project-specific instructions before redistributing modified designs or selling a finished robot. Open-source access gives you the freedom to learn from the design; it does not eliminate the need to follow the applicable license.
10. Step-by-Step Robot Dog Assembly
Start by printing the required components and checking them against the hardware list. Before installing any servos, identify each leg part, joint, horn, and mounting point so that you understand how the pieces fit together. Keep the screws and small components organized, and inspect the printed parts for blocked holes or rough edges. If a joint is too tight, correct the fit carefully instead of forcing the servo into place. Mechanical problems are much easier to fix before the electronics are installed inside the frame.
Next, mount the servos according to the design instructions and route their wires through the intended channels. Install the controller, display, and other electronics in the designated locations, keeping the wiring clear of moving parts. Connect the motors to the correct outputs and verify the display connections before applying power. Do not copy pin numbers from a different Sesame hardware revision, because an apparently similar board may use a different wiring layout. The project’s main Sesame build guide provides useful examples of motor installation, wire routing, and assembly checks, but the Micro version’s own instructions should take priority for its particular design.
Finally, test the robot before attempting to walk. Confirm that the controller starts correctly, the display operates, and each servo responds to the expected command. If the firmware provides a calibration or standby procedure, follow it before attaching or moving the joints through their full range. Keep the robot supported while testing initial poses so that an incorrectly positioned leg does not cause the frame to fall. Only proceed to walking sequences after confirming that the mechanical assembly and motor connections are correct.
11. Installing the Firmware
The firmware is what turns the printed structure and electronics into a programmable robot. The Micro repository provides separate firmware folders for the main controller and the Wi-Fi bridge, so you should identify the correct target board before compiling anything. The main-board firmware is based on an Arduino-style sketch, while the bridge firmware targets the Seeed XIAO ESP32-C6. These are separate components, and flashing one does not automatically install the other.
A typical installation workflow looks like this:
- Install the Arduino IDE on your computer.
- Install the appropriate ESP32 board support package.
- Download or clone the official Micro repository.
- Open the main-board sketch in the Arduino IDE and check its required libraries and board configuration.
- Connect the main controller using a suitable USB data cable, select the correct board and serial port, and upload the firmware.
- Configure the separate Wi-Fi bridge firmware for the supported XIAO ESP32-C6 hardware and upload it to that board.
- Check startup messages, the display, and serial communication before testing movement.
The repository’s current instructions should be treated as the source of truth for the exact board settings, libraries, and pin definitions. Do not blindly apply settings from the larger Sesame project to the Micro project. If compilation fails, check the error message, selected board, library versions, and whether all required source files are present.
12. Connecting the Robot Dog to Wi-Fi
Wireless control is one of the most practical features of the project. Instead of requiring a dedicated handheld controller, the Wi-Fi bridge can create a wireless access point and provide a web interface for sending commands. A phone, tablet, or computer can connect to the robot’s network and use the supported controls through a browser. This makes demonstrations more convenient because you can trigger movements and animations without connecting a separate control device through a cable.
In the Micro version, the ESP32-C6 bridge is designed to forward commands to the main board over a serial connection. The bridge’s documented wiring includes a shared ground and a transmit connection from the ESP32-C6 to the main controller’s receive pin. Follow the exact pin definitions in the current firmware rather than relying on generic ESP32 wiring examples.
Once the firmware is running, connect your phone to the configured network and open the controller interface according to the repository’s instructions. Start with a simple stop, rest, or standing command before trying a more complicated animation. If the page does not load, check whether the phone actually connected to the robot’s access point, whether the bridge firmware started successfully, and whether the serial connection is correct. Avoid exposing an unsecured control interface to untrusted networks, especially if you later modify the robot to operate in a shared environment.
13. Walking, Dancing, and Custom Animations
The most entertaining part of this project is seeing software commands produce visible physical behavior. The Micro firmware lists motion commands and poses such as forward, backward, left, right, stop, rest, stand, wave, dance, push-up, bow, and several playful movements. The exact supported commands depend on the firmware version you install, but the existing library gives builders a collection of behaviors to explore before writing their own.
Walking and dancing are technically different challenges. A walking sequence needs to coordinate leg movements in a way that helps the robot maintain contact with the ground, while a dance can prioritize expressive poses and timed sequences. Even small changes to the angle of a servo or the delay between poses can significantly change the appearance of a movement. Experimenting with these parameters helps you understand the relationship between joint positions, timing, balance, and the robot’s overall behavior.
Custom animations can make your version unique. You could create a greeting sequence, a short celebration, a slow resting motion, or a series of poses synchronized with changes on the OLED screen. Start with small, controlled adjustments, and test each sequence while the robot is supported. A dramatic movement may look impressive on screen but cause the robot to tip over if its weight shifts too far. The goal is to create behavior that is expressive without putting unnecessary strain on the servos or printed parts.
14. Programming and Customization Ideas
Once the robot is operating reliably, you can treat it as a development platform rather than a finished gadget. The simplest modification might be changing the OLED face or adjusting the timing of an existing animation. More ambitious experiments could include a custom phone interface, additional motion commands, a Python application that sends requests over the local network, or a different communication protocol. The Micro project’s separation between its main controller and wireless bridge makes it a useful starting point for exploring how different software components can cooperate.
You could also introduce basic sensor-based behavior. For example, an appropriate distance sensor could help the robot stop when an obstacle is detected, while an inertial measurement unit could provide information about the robot’s orientation. These additions require suitable hardware, electrical integration, and new control logic; they are not automatically included just because the robot uses an ESP32. More advanced projects could investigate voice commands, camera-based recognition, or connections to external AI services, but each would require its own software and hardware work.
Another rewarding experiment is improving the developer experience. You could create a simple dashboard showing the current command, expose animation presets, or build a Python tool for testing servo positions one at a time. Such improvements may not make the robot look more impressive immediately, but they can make it easier to maintain, calibrate, and expand. That is one of the biggest advantages of open-source robotics: the project can evolve as your skills grow.
15. Common Problems and Troubleshooting
Like most DIY robotics projects, the Sesame Robot Micro may need some debugging before everything works as expected. One common issue is erratic servo movement. This can result from incorrect wiring, unsuitable power delivery, an incorrect servo configuration, or incompatible software libraries. If the robot resets whenever several motors move together, investigate the power supply and wiring before assuming that the firmware is faulty. Servo motors can draw much more current during movement than when they are idle, and an inadequate supply can make the controller unstable.
Another possible issue is incorrect movement. If a leg moves in the wrong direction, check whether the motor is connected to the correct output and whether its physical orientation matches the design. Also verify that the servo positions are calibrated correctly before running a full animation. The main Sesame firmware documentation specifically recommends a pinned ESP32Servo library version for its documented build because newer versions have exhibited a multi-channel control issue. However, you should confirm which library requirements apply to the Micro firmware before making changes.
Wi-Fi problems can have several causes, including incorrect firmware configuration, a missing bridge connection, or a phone that has not connected to the robot’s access point. Check the startup behavior of both controllers and verify the serial wiring if the web interface responds but the motors do not. For safety, disconnect power before changing connections, keep exposed wires insulated, and never force a servo against a mechanical stop. A systematic approach—checking power, wiring, firmware, and mechanical alignment separately—will usually make troubleshooting easier.
16. Estimated Cost and Tools Required
The cost of building this robot depends on where you purchase the electronics, whether you already own a 3D printer, and which controller configuration you choose. The larger Sesame project’s documentation describes a hardware budget of approximately US$50–60 for its stated build, but that figure should not be treated as a current, guaranteed price for the Micro version or as a complete delivered cost in India. Local component prices, shipping, spare motors, printing materials, and power hardware can change the total significantly.
| Expense | What affects the cost |
|---|---|
| ESP32 controllers | The main controller and Wi-Fi bridge configuration |
| Eight servo motors | Quality, compatibility, and spare motors |
| OLED display | Screen size and controller compatibility |
| 3D printing | Filament, failed prints, and printer availability |
| Wiring and assembly hardware | Connectors, screws, wire, and solder |
| Power supply or battery | Required current, voltage regulation, and safe connectors |
| Tools | Soldering equipment, cutters, screwdrivers, and a USB data cable |
If you already own a 3D printer and basic electronics tools, the project becomes more economical because you can print replacement parts and reuse your equipment. If you are starting from scratch, budget for the complete assembly rather than just the microcontroller and servos. It is also sensible to buy a small number of spare mechanical fasteners and, where your budget permits, a spare servo. This can prevent a damaged component from bringing the entire project to a halt.
17. What Makes This Project Useful for Learning Robotics?
A small robot dog is an excellent way to connect concepts that are often taught separately. You can learn embedded programming by modifying the firmware, electronics by building and testing the wiring, mechanical engineering by assembling the printed joints, and networking by controlling the robot over Wi-Fi. Because the system is physically visible, the consequences of a programming change are easier to observe than in a purely software-based exercise. If a movement is too fast or a joint is misaligned, you can see the result immediately and adjust your approach.
For students, the project can serve as a foundation for understanding actuators, control signals, microcontroller interfaces, and basic motion planning. For hobbyists, it provides a practical route into 3D design and firmware customization. For content creators and makers, it also offers plenty of opportunities to demonstrate the build process, explain how individual components work, and show the difference between a basic animation and a more carefully calibrated movement sequence.
The most important lesson is that robotics is not simply about making motors spin. A successful robot combines mechanical design, electrical reliability, software, and testing into one working system. This project lets you explore all four areas without having to design an entire robot from nothing. Once you understand how the basic system operates, you can start making informed changes instead of relying on trial and error alone.
18. Limitations and Future Improvements
Despite its impressive appearance, the Sesame Robot Micro should be understood as an experimental robotics project rather than a ready-made autonomous companion. The Micro repository explicitly warns that the project is intended for experimentation and active development and may have rough edges. Builders should therefore be comfortable reading documentation, investigating errors, and adjusting their setup when necessary. If you want a more beginner-oriented experience, the larger Sesame Robot repository provides more extensive documentation and build guidance.
The robot’s movements are also limited by its mechanical design, servo capabilities, power system, and programmed behavior. Eight servos do not automatically guarantee smooth walking, accurate balance, or autonomous navigation. Additional capabilities require more than adding a sensor: you must integrate its data into software that makes suitable decisions and commands the robot safely. Battery life, weight distribution, joint strength, and heat generation may also become important as you expand the design.
Future improvements could include better movement calibration, additional sensors, improved wireless controls, new facial expressions, or a more accessible animation editor. You might even develop a separate application that combines voice commands with the existing movement interface. These ideas are possibilities for further development, not features that should be assumed to work in the current Micro firmware. Starting with a stable build and adding one improvement at a time is the best way to understand what actually makes the robot better.
19. Conclusion
The Sesame Robot Micro demonstrates how accessible modern DIY robotics has become. By combining an ESP32-based control system, eight servo motors, an OLED display, and 3D-printed mechanical parts, the project gives makers a practical way to experiment with a four-legged robot. Its programmed movements and expressive face make it entertaining, while its open-source hardware and firmware provide opportunities to learn embedded programming, mechanical design, and wireless communication.
You do not need to invent every component yourself. You can begin with the published files, assemble the hardware, upload the firmware, and gradually customize the robot as your understanding improves. Just remember to follow the correct build instructions, verify the power requirements, and expect some debugging along the way.
Ready to build your own robotic pet? Watch Dorian Todd’s YouTube video and explore the Sesame Robot Micro GitHub repository to get started.
Would you build one of these ESP32 robot dogs? Share your thoughts, and tell us which feature you would add first: obstacle detection, voice control, or custom AI-powered animations!
20. Frequently Asked Questions
1. Can beginners build the Sesame Robot Micro?
Yes, beginners can attempt the project if they have access to a 3D printer and are willing to learn basic electronics, soldering, and embedded programming. However, the Micro version is explicitly experimental, so it may require more troubleshooting than a fully documented beginner kit. Reading the repository carefully before buying components will help you determine whether it matches your current skill level.
2. What controller does the robot use?
The Micro project’s Wi-Fi bridge firmware targets the Seeed XIAO ESP32-C6, while the main-board firmware runs on a separate controller. Check the repository’s hardware documentation for the precise controller arrangement and compatible connections before ordering parts. Do not assume that the Micro and full Sesame Robot use identical electronics.
3. Can I control the robot dog with my phone?
The Micro project’s Wi-Fi bridge provides a wireless access point and web-based control interface. A compatible phone can connect to the robot’s network and send supported commands through the interface. The exact setup depends on the firmware and hardware configuration you install.
4. Do I need a 3D printer to build it?
A 3D printer is the intended way to manufacture the custom body parts from the supplied files. If you do not own one, you can investigate local 3D-printing services or maker spaces. Make sure the printed components match the design and fit the specified servos before assembling the robot.
5. Is the robot truly open source?
The project publishes its hardware design files and firmware in a public GitHub repository. Its license and usage conditions should be checked before redistributing modified files or commercializing a build. Access to source files makes experimentation possible, but the project is still under active development and may require technical adjustments.
Official Project Links
- GitHub repository: Sesame Robot Micro
- YouTube video: Watch Dorian Todd’s robot demonstration
- Related project: Full Sesame Robot project and build documentation
Suggested SEO keywords: ESP32 robot dog, DIY quadruped robot, Sesame Robot Micro, open-source robot dog, 3D-printed robot, ESP32 robotics project, Arduino robotics, Wi-Fi-controlled robot, DIY robotics for beginners, open-source robotics.
Suggested meta description: Build your own ESP32 robot dog with 3D-printed parts, eight servo motors, an OLED face, and Wi-Fi control. Explore the open-source Sesame Robot Micro project.