An Open-Source Quadruped Robot You Can Build Yourself
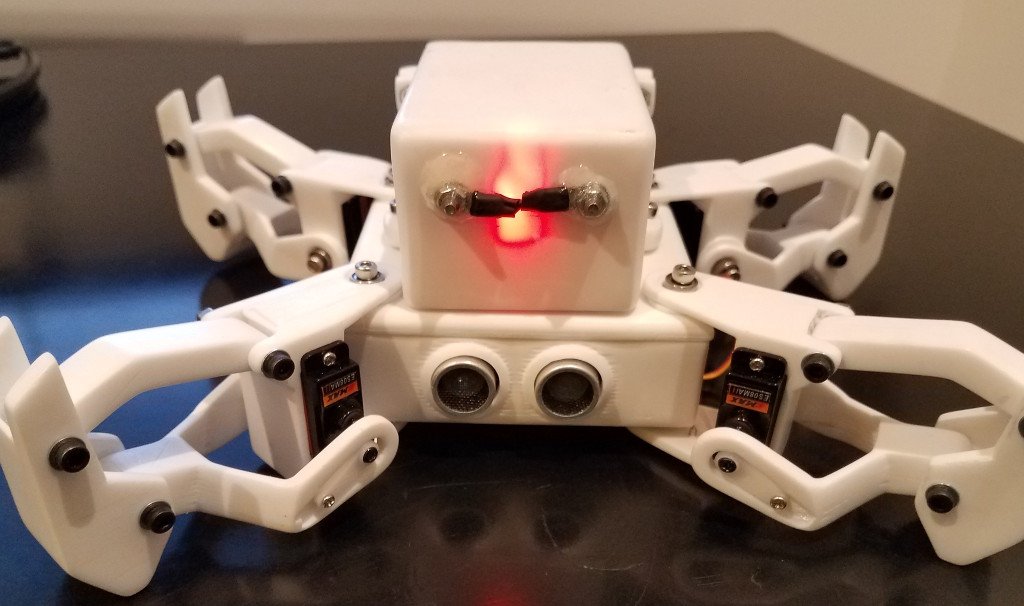
Imagine having your own robotic pet that can walk, turn, respond to commands, and eventually become a platform for artificial intelligence experiments. You do not need to purchase an expensive commercial robot to begin exploring this exciting world. Projects like Peabot, an open-source quadruped robot powered by Raspberry Pi, give makers an opportunity to experiment with mechanical engineering, embedded programming, electronics, and robotics using accessible components. Its software repository includes motion-control functionality, configurable settings, a command-line interface, and a RESTful web service for sending commands over HTTP. The project also provides customized 3D-printable body components, making it an interesting starting point for anyone who wants to build a robot rather than simply buy one.
What makes Peabot especially interesting is the freedom to explore how a four-legged robot works internally. You can examine how servo motors move its legs, how a Raspberry Pi communicates with a controller board, and how software translates a simple command into a physical movement. You can also experiment with remote control and consider how additional sensors or AI-based features could extend the robot’s capabilities. For students, engineers, hobbyists, and open-source enthusiasts, Peabot is more than a robotic dog: it is a practical learning platform that connects software with the physical world.
What Is Peabot and Why Is It Interesting?
Peabot is an open-source quadruped robot control project designed around a custom-built, four-legged robot. Its associated software provides reusable functions for controlling robot movements, including walking, turning, extending joints, returning to a neutral position, and halting movement. Instead of requiring you to create every movement routine from scratch, the project provides a framework that you can inspect, configure, and modify to suit your hardware. The repository is available publicly on GitHub under the MIT license, which makes it a useful starting point for developers who want to study and adapt the code while following the license terms.
The project is particularly appealing because it combines several areas of engineering in one build. The 3D-printed structure introduces mechanical design and fabrication, the servo motors introduce actuator control, and the Raspberry Pi provides a programmable computing platform. On the software side, developers can work with low-level hardware interfaces, motion sequences, configuration files, and network communication. Each part teaches a different lesson, but the real value comes from making all those parts work together. If you are interested in learning robotics through hands-on experimentation, Peabot offers a way to move beyond simulations and see how your code influences an actual machine.
How Peabot’s Raspberry Pi Control System Works
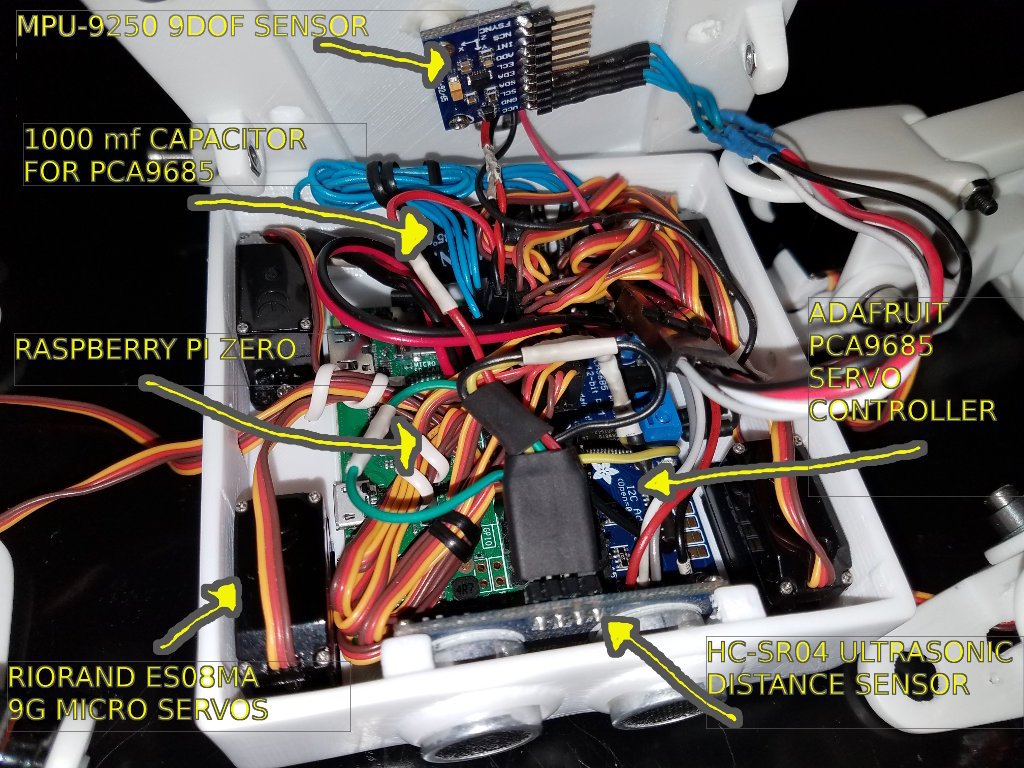
The Raspberry Pi acts as the central computing platform for Peabot, running software that coordinates the robot’s movements and handles incoming commands. The repository describes a Raspberry Pi Zero as its default target, alongside the Raspbian operating system and a PCA9685 servo controller. Think of the Raspberry Pi as the robot’s brain: it decides which movement sequence to execute, while the controller and servos translate those instructions into physical motion. This separation is useful because a small computer can manage high-level behavior without needing to generate every servo-control signal directly through its own pins. The software also supports configuration options, allowing builders to adjust aspects of how the robot operates rather than relying entirely on fixed settings.
A typical build combines the computing board with a servo controller, several micro servos, a suitable battery arrangement, and optionally sensors for measuring distance and orientation. These components have different responsibilities, so careful integration matters just as much as writing the code. The robot must receive commands, calculate the required movements, send the appropriate control signals, and supply enough electrical power to move its legs. If any of these elements is poorly configured, the robot may behave unpredictably, reset during movement, or struggle to maintain a consistent gait. That is why Peabot is a useful learning project: it exposes the relationship between software, electronics, power management, and mechanical movement in one practical system.
Servo Motors and the PCA9685 Controller
Servo motors are the components that bring Peabot to life. The documented default design uses eight micro servos, with two servos controlling each leg. One servo can control a hip joint while the other controls a knee joint, allowing the robot to change its leg position and coordinate a walking sequence. The software organizes these movements into animations, changing servo positions in a planned order to produce actions such as walking and turning. Rather than treating every servo as an independent motor, the controller coordinates their positions so that the legs move together in a repeatable pattern.
The PCA9685 board makes this arrangement easier to manage by providing multiple PWM output channels controlled through an I²C connection. Peabot’s documented setup assigns eight of those channels to the robot’s hip and knee servos. The Raspberry Pi communicates with the controller, and the controller produces the signals used to position the servos. This approach reduces the need to generate separate servo timing signals directly from the Raspberry Pi for every joint. It also gives makers a clear place to begin when troubleshooting: check the I²C communication, confirm the channel assignments, verify the servo positions, and ensure that the power supply can handle the load. Before running any movement routine, builders should calibrate the mechanical joints and configure safe motion limits to prevent the servos from forcing the printed parts against their physical stops.
Sensors, Movement, and Power Management
Peabot’s documented hardware options include an HC-SR04 ultrasonic distance sensor and an MPU-9250 motion-sensing module. The ultrasonic sensor measures the distance to nearby objects, while the MPU-9250 can measure acceleration, angular velocity, and magnetic-field direction. These sensors introduce opportunities for future obstacle detection, movement monitoring, and orientation-aware behavior. However, having a sensor connected does not automatically mean the robot can avoid obstacles or balance itself autonomously. Those capabilities require software that reads the sensor data, interprets the measurements, and adjusts the robot’s behavior appropriately. The project documentation lists automatic stabilization and more advanced sensor-data management among planned features, so builders should distinguish between the existing motion-control framework and functionality that still needs development.
Power management is equally important. A Raspberry Pi and its sensors have different electrical requirements from a collection of moving servos, which can draw substantial current when starting, changing direction, or encountering resistance. Peabot’s documented setup recommends separate power arrangements for the computing electronics and the servos, with suitable regulation for the servo supply. This helps reduce the risk that motor-current spikes will destabilize the computer’s power supply. Do not copy an older wiring diagram blindly: verify the exact Raspberry Pi model, controller board, sensor voltage levels, servo specifications, regulator ratings, and battery configuration before connecting anything. In particular, confirm GPIO voltage compatibility and common-ground requirements, and never connect a battery directly to a Raspberry Pi pin unless the connection is explicitly designed for that purpose.
Exploring Peabot’s Main Features
Peabot is designed to provide a foundation for controlling a quadruped robot rather than a single demonstration routine. Its documented software features include motion commands, an interactive command prompt, configuration through command-line options and files, and an HTTP-based RESTful interface. This combination gives builders several ways to interact with the robot. A beginner might start with commands in the terminal, while a developer could create a separate interface that sends commands through the network. The same underlying motion-control functions can therefore support different experiments without requiring a completely separate control system for each one.
The practical benefit is flexibility. You can start with a simple walking routine, tune the movement parameters, and gradually experiment with more complicated sequences. You can investigate how movement duration affects the gait, how joint limits change the robot’s posture, and how the timing between legs affects stability. You can also separate the control logic from the user interface, making it easier to experiment with different ways of operating the robot. For a robotics enthusiast, this is a chance to learn how a reusable control framework can grow alongside a project, from basic movement tests to more sophisticated software integrations.
Walking, Turning, and Custom Movements
Walking is one of the most interesting parts of any quadruped project because it requires coordinated movement across multiple joints. Each leg must move at the right time and return to a position that supports the robot’s body. Peabot includes commands for walking and turning, with parameters that control aspects such as the number of cycles, duration, and direction. It also includes movement routines for extending or retracting joints and resetting the robot to a neutral position. These functions provide a starting point for exploring gait design without having to implement every movement primitive from scratch.
Once the basic motions work, you can experiment with the relationship between timing and performance. A slower gait may be easier to observe and debug, while a faster sequence can expose problems with joint calibration, traction, or the mechanical structure. You might adjust the position of a foot during the swing phase, test different delays between leg movements, or modify the motion sequence to make turning smoother. Keep in mind that changing software parameters cannot compensate for every mechanical problem: a poorly balanced frame, loose joints, or insufficient servo torque may still prevent reliable movement. Test each adjustment with the robot supported safely, then progress to short walking trials on a clear, level surface.
Remote Robot Control Through a REST API
One of Peabot’s standout software features is its RESTful web service. When HTTP support is enabled and configured, an external application can send requests to the robot over a network. The documented API includes endpoints for walking, turning, extending joints, resetting the servos, halting movement, and retrieving a distance reading from the ultrasonic sensor. For example, a client can send a POST request to the walking endpoint with JSON parameters that specify the number of cycles, duration, and direction. This gives developers a way to build their own control interfaces instead of relying only on the robot’s command-line prompt.
Imagine creating a simple web dashboard with directional controls, movement buttons, and a sensor-readout panel. A phone, laptop, or another computer could act as the interface, while the Raspberry Pi receives the commands and runs the corresponding motion routine. You could also explore a Python client, a browser-based control page, or a home-lab automation system. These are development possibilities rather than built-in features guaranteed by the repository, so the client software would need to be created and tested separately. Before exposing the API beyond a trusted local network, add appropriate authentication, encryption, input validation, and network restrictions. The repository lists authentication and encryption for REST requests among its planned features, which means you should not assume that the existing service is secure for unrestricted internet access.
3D Printing Your Own Robotic Dog
3D printing makes a project like Peabot much more accessible to makers who want to build and modify a physical robot. Instead of depending entirely on custom-machined metal parts or a manufactured chassis, you can print a body structure, battery compartment, and other components, then assemble them with the electronics. The Peabot repository includes customized body-related models, and its documentation points to a separate quadruped leg design as a recommended starting point. This means the build combines existing mechanical ideas with a frame that can be adapted to the maker’s requirements.
The best part is the opportunity to iterate. If a battery compartment is too small, you can revise the dimensions and print it again. If a servo mount is loose, you can modify the tolerances rather than rebuilding the entire robot. You can also experiment with different materials, body shapes, cable-routing arrangements, and mounting points for sensors. However, print quality affects reliability: thin joints, poorly oriented layers, and loose fasteners can fail when the legs repeatedly apply force to the frame. Start with conservative motion settings, inspect the printed parts for cracks or deformation, and make sure that the servo mounts remain secure throughout testing.
Mechanical Design and Customization
A successful 3D-printed robot is not just a collection of attractive plastic parts. Its geometry determines how the legs move, where the center of mass sits, how the batteries fit, and how much force the joints experience. The distance between the hip and knee joints affects the robot’s range of motion, while the foot design influences its grip on the floor. If you modify the body or legs, you may also need to adjust servo positions and movement parameters to account for changes in the geometry. This is why mechanical customization and software calibration should be treated as connected tasks rather than separate stages.
For a first build, follow a documented design as closely as possible before introducing major changes. Verify the dimensions of the servo mounts, the clearance around moving joints, and the placement of wiring before printing the final parts. Once the robot walks reliably, you can experiment with lightweight covers, improved cable management, replaceable feet, or a redesigned battery holder. Keep the total weight in mind, because additional plastic, accessories, or sensors can increase the torque required from the servos. Small changes can have a surprisingly large effect on walking performance, making Peabot a valuable project for anyone interested in mechanical design, rapid prototyping, and iterative engineering.
Software Architecture and Open-Source Development
Peabot is also interesting from a software engineering perspective. Its repository contains source code, libraries, configuration files, utility directories, and 3D model files, giving developers several places to explore. The control software is written in C and is designed around reusable functions for managing robot movements and handling commands. Rather than embedding every movement into a single hard-coded routine, the project organizes actions so they can be requested through the command prompt or the REST API. This architecture provides a useful introduction to modular programming, hardware abstraction, configuration management, and the relationship between application software and embedded hardware.
Open-source development also creates opportunities for collaboration. You can study how the existing software works, report bugs, experiment with improvements, or adapt the framework for a different robot. The repository’s MIT license makes it particularly approachable for people who want to learn from the implementation and build their own projects, subject to the license’s conditions. Before changing the software, read the documentation and understand how commands are dispatched, how movement sequences are timed, and how hardware-specific settings are configured. Working through a project like this is an excellent way to develop practical programming skills because your changes produce observable results in the physical world.
Getting Started With the Peabot GitHub Repository
If you want to explore Peabot, begin with the original project repository rather than relying on third-party summaries or unverified wiring diagrams.
Project repository: Peabot-Library on GitHub
The repository contains the source code, installation instructions, configuration options, hardware information, and 3D-printable models. Start by reading the README, checking the current source files, and reviewing the license before purchasing components. The documented build targets a Raspberry Pi running Raspbian and uses WiringPi alongside a PCA9685 software library. Because software dependencies and operating-system support can change over time, check the current compatibility of these components with your Raspberry Pi and operating-system version before following the installation steps exactly as written.
Hardware and Software Requirements
A typical Peabot build involves a Raspberry Pi, eight micro servos, a PCA9685 servo controller, a suitable battery system, and 3D-printed mechanical components. Optional sensors include an HC-SR04 ultrasonic distance sensor and an MPU-9250 motion sensor. You will also need wiring, fasteners, a suitable voltage regulator for the servos, and access to a 3D printer or a service that can print the parts. The exact parts you choose should be checked against the repository’s wiring and configuration documentation because substitutions may require changes to the code or mechanical design.
| Component | Purpose |
|---|---|
| Raspberry Pi Zero or compatible setup | Runs the robot-control software |
| Eight micro servos | Move the four legs through coordinated joints |
| PCA9685 controller | Provides multiple servo-control channels |
| 3D-printed frame and legs | Form the robot’s physical structure |
| Suitable batteries and regulators | Supply stable power to the electronics and motors |
| HC-SR04 sensor (optional) | Measures distance to nearby objects |
| MPU-9250 sensor (optional) | Measures motion and orientation-related data |
The table summarizes the documented design approach, not a guaranteed shopping list for every hardware revision. Check the availability and compatibility of the specific components before ordering them. In particular, the power system needs careful planning because servos can draw high currents under load, and a suitable regulator must be selected according to the motors’ voltage and current requirements.
Installation and Initial Setup
The documented installation process starts by cloning the repository to the Raspberry Pi, installing the required dependencies, compiling the application, and installing the resulting program. The README describes using make followed by make install, with elevated permissions where required, and launching the program with appropriate GPIO permissions. It also explains how configuration files and command-line options can be used to adjust settings. Since the documented software assumes particular system dependencies, verify that they work on your chosen operating system before treating these commands as a guaranteed installation procedure.
Once the software is installed, avoid immediately attempting a full walking sequence. First, verify the wiring and power connections, confirm that the servo controller communicates correctly with the Raspberry Pi, and check that each servo responds to a small, safe movement. Ensure the robot’s legs are clear of the table and other objects while you test the joints. After calibration, try the documented neutral-position reset and short movement commands. Only progress to longer walking routines once the servos move in the correct directions, the printed parts remain secure, and the power system operates reliably. This gradual approach makes debugging easier and reduces the chance of damaging the robot.
Robotics Education and STEM Learning Opportunities
Peabot can be a valuable educational project because it combines multiple engineering disciplines in one tangible system. Students can investigate servo control, digital communication, power electronics, mechanical design, and software development while observing how each discipline affects the robot’s behavior. Instead of learning these concepts only through diagrams, they can experiment with real components and measure the results. For example, changing a joint’s motion range demonstrates the relationship between control parameters and mechanical geometry, while measuring voltage during movement introduces practical power-system troubleshooting. The project can also encourage collaborative work, with different team members taking responsibility for the chassis, electronics, firmware, testing, and documentation.
For teachers and STEM mentors, the robot offers a foundation for progressively more complex activities. Beginners can assemble the frame and test individual servos, while more advanced students can adjust the gait, build a remote-control interface, or experiment with distance sensing. Computer science learners can explore API requests and JSON, while mechanical engineering students can compare different leg geometries and printed materials. The important advantage is that these activities connect abstract concepts to visible outcomes. A robot that fails to turn smoothly creates a real debugging problem, encouraging students to formulate hypotheses, test changes, record observations, and refine their designs.
Adding AI, Computer Vision, and Autonomous Features
One of the most exciting possibilities is extending Peabot beyond manually triggered movements. A Raspberry Pi-based robot can potentially serve as a platform for computer vision, voice commands, sensor-driven behavior, and AI-assisted experimentation. For example, you could develop a separate application that recognizes a visual marker and sends a turning command through the REST API. Alternatively, you could build a voice interface that translates spoken instructions into supported movement commands. These features would require additional hardware or software, integration work, and testing; they should be viewed as possible extensions rather than capabilities that are already fully implemented in Peabot.
Obstacle avoidance is another interesting project idea. The optional ultrasonic sensor provides distance readings that a developer could use to trigger a stop or a change in direction when an obstacle is detected. However, reliable autonomous navigation requires more than a distance measurement. The software needs to handle noisy readings, choose appropriate responses, avoid repeated stop-and-turn loops, and ensure that a movement command does not continue after a safety condition is triggered. A more advanced version could combine distance measurements with motion-sensor data to estimate changes in orientation and improve movement consistency.
Automatic stabilization would be another worthwhile challenge. A robot can appear to walk correctly on a flat floor but struggle when its body tilts or its feet encounter an uneven surface. A motion sensor can provide useful measurements, but a stabilization system needs feedback logic that interprets those measurements and adjusts joint positions appropriately. This requires careful calibration, an understanding of the robot’s geometry, and a control strategy that operates quickly enough to respond to movement. Peabot’s documentation identifies AI, sensor-data management, and automatic stabilization as planned areas for development, so these are especially relevant opportunities for contributors who want to help extend the project.
Challenges to Consider Before Building Peabot
Although an open-source robot can be more flexible than a closed commercial product, building one still requires patience and technical troubleshooting. Mechanical assembly, servo calibration, wiring, dependency installation, and power management can each introduce problems. A robot may fail to walk because a servo is installed at the wrong angle, a joint binds against the printed frame, or the movement timing does not suit the mechanical geometry. Similarly, an unstable power supply can cause unexpected resets or inconsistent movement. The best strategy is to test each subsystem individually before combining them into a complete robot.
Another consideration is that open-source software does not automatically provide every feature associated with modern autonomous robots. Peabot’s documented motion commands and REST API are useful foundations, but advanced computer vision, reliable self-balancing, sophisticated navigation, and secure remote access require additional implementation. Builders should also account for the capabilities and limitations of the selected Raspberry Pi, since more computationally demanding AI workloads may require optimization or additional hardware. Treating these challenges as engineering opportunities, rather than expecting a finished autonomous robot immediately, makes the project much more rewarding.
Conclusion: Is Peabot Worth Exploring?
Peabot is an interesting example of how open-source software, Raspberry Pi computing, servo motors, and 3D printing can come together to create a programmable quadruped robot. Its motion-control framework, configurable operation, and RESTful interface give makers several ways to experiment with robot behavior. The project is particularly useful for people who want to understand how a physical robot works instead of treating it as a black box. Its public GitHub repository also provides an entry point for developers who want to examine the code, modify the design, or contribute their own improvements.
The bigger opportunity lies in what you can build on top of the existing platform. You could develop a mobile control dashboard, experiment with new walking patterns, integrate additional sensors, or investigate how computer vision and feedback control could improve the robot. Each extension creates a new engineering challenge and a chance to learn something practical. If you enjoy Raspberry Pi projects, robotics, embedded programming, or 3D printing, Peabot is worth examining as a starting point for your next maker project.
Explore the code and models here: https://github.com/mpmumau/Peabot-Library
Frequently Asked Questions
1. What is Peabot?
Peabot is an open-source software project for controlling a custom-built, four-legged robot. It supports movement routines such as walking and turning, offers command-line control, and provides a RESTful web API for sending commands over HTTP. The associated repository also includes 3D-printable body components and hardware guidance.
2. Which Raspberry Pi does Peabot use?
The documented default hardware configuration uses a Raspberry Pi Zero running Raspbian. Before using another Raspberry Pi model or a newer operating-system release, verify that the software’s dependencies and hardware interfaces are compatible with your setup.
3. Can I control Peabot remotely?
Yes. The project documents a RESTful HTTP service that can accept movement commands, including walking, turning, resetting, and halting. You can use this interface as a foundation for a custom web dashboard or another remote-control client. Configure network access carefully, and do not expose the service to the public internet without appropriate security protections.
4. Can I add AI or obstacle avoidance to Peabot?
You can develop these features as extensions. For example, an application could use computer vision to identify objects or process voice commands, then send movement instructions to the robot. Obstacle avoidance could also be developed using distance-sensor readings. These features require additional software, integration, and testing; they are not guaranteed to work simply by assembling the documented hardware.
5. Where can I download the Peabot source code and 3D models?
You can access the project on GitHub at mpmumau/Peabot-Library. The repository includes source code, documentation, configuration files, and a 3d_models directory. Review the README and license before starting your build, and check the current hardware and software requirements.
Share Your Thoughts
What would you add to Peabot first: AI vision, voice control, obstacle avoidance, autonomous navigation, or real-time balance control?
Share your idea in the comments, and explore the source code to see how you could build on this open-source robotics project.
Follow @vaishabhjalmi on Instagram for more robotics projects, AI tools, engineering experiments, Raspberry Pi builds, and futuristic technology.