A tiny development board, a handful of micro servos, 3D-printed parts, and a little embedded AI can bring an adorable robotic dog to life. The voice-controlled ESP32 robot dog by Tech Talkies is an exciting DIY robotics project that combines speech recognition, servo control, mechanical design, and embedded programming in one compact build. Unlike a conventional remote-controlled toy, this robot can listen for voice commands and perform actions such as walking, sitting, stretching, and dancing.
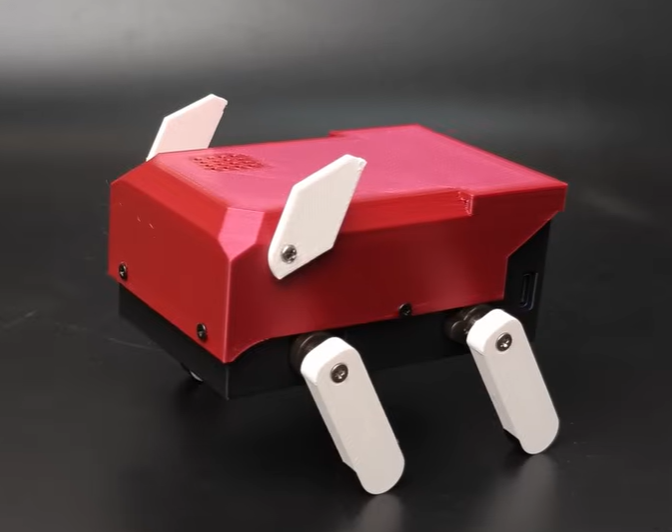
The project uses the Seeed Studio XIAO ESP32-S3 Sense and ESP-Skainet for on-device speech recognition, according to the project description published with the video. Its offline voice-control approach means the robot can recognize supported commands without depending on a cloud service or smartphone connection. The source code and construction details are available on GitHub, making this a useful starting point for students, electronics enthusiasts, and robotics makers.
1. What Is the Voice-Controlled ESP32 Robot Dog?
Imagine saying, “Walk,” and watching a tiny four-legged robot move across your desk. Tell it to sit, and its legs shift into a sitting position. Give it another supported command, and it might stretch, dance, or wag its body in response. That is the idea behind this voice-controlled DIY robot dog, a project that brings together mechanical movement and speech recognition in a maker-friendly package.
Developed by Tech Talkies, the project uses the Seeed Studio XIAO ESP32-S3 Sense microcontroller board and ESP-Skainet speech-recognition technology. The robot combines a compact electronic controller with servo-driven legs and a lightweight, custom-built mechanical structure. Instead of relying entirely on a conventional remote control, it responds to recognized spoken instructions. According to the project’s published description, supported actions include walking, sitting, lying down, stretching, dancing, and responding to the phrase “good boy.”
What makes the project interesting is that it is more than a moving toy. It demonstrates how embedded electronics, mechanical engineering, and speech-processing software can work together in a small autonomous system. The robot does not need to be the size of an industrial quadruped to demonstrate important robotics concepts. Even a desktop-sized machine can teach you about coordinated movement, control signals, power management, and human-machine interaction.
The project is also open source, with its code and build information published on GitHub. That gives makers an opportunity to study the implementation, reproduce the original design, and experiment with their own improvements. If you are interested in robotics but do not know where to begin, a project like this provides a practical bridge between writing your first microcontroller program and building a complete interactive machine.
2. Why This DIY Robotics Project Is Worth Exploring
Robotics can look intimidating when you first encounter it. Commercial robot dogs often feature expensive actuators, sophisticated sensors, complex control systems, and specialized software. However, you do not need a research laboratory to begin learning the underlying principles. An affordable microcontroller, suitable servos, basic fabrication tools, and a willingness to experiment can help you explore many of the same foundational ideas.
This project is particularly appealing because it combines several disciplines in one build. You will encounter embedded programming while working with the microcontroller, mechanical design while assembling the legs, and motion control while coordinating the servos. Voice recognition introduces another layer, showing how a robot can interpret a limited set of spoken commands instead of requiring every movement to be triggered by a physical button.
The offline aspect is another major attraction. Many voice-enabled gadgets send audio to a remote server for processing, but this robot’s speech-recognition approach runs locally on its supported hardware. That reduces dependence on internet connectivity for its supported voice commands and can improve privacy because cloud transmission is not required for that recognition workflow. It also gives developers a useful opportunity to explore edge AI, where computation happens directly on a device rather than being delegated to a remote service.
For students and makers, the project also offers a satisfying path from theory to a working prototype. You can start by reproducing the basic build, then modify the movement patterns, adjust the chassis, improve the power system, or add sensors. Every change gives you an opportunity to observe how software and hardware interact. Rather than simply assembling a product and putting it away, you can treat the robot as an experimental platform that grows alongside your skills.
3. Hardware Components Required
Before starting the build, it is important to understand the hardware that makes a voice-controlled robot dog possible. The central idea is simple: a microcontroller processes recognized commands, firmware converts those commands into movement instructions, and servo motors move the robot’s legs. The supporting hardware provides power, structure, and the connections needed to make everything work together. The original Tech Talkies project uses a compact design built around the XIAO ESP32-S3 Sense, four micro servos, a LiPo battery, 3D-printed components, and a custom PCB.
Your exact shopping list should follow the project’s GitHub documentation rather than a generic parts list, because servo dimensions, connector arrangements, battery requirements, and mechanical designs can vary between robot builds.
| Component | Purpose |
|---|---|
| Seeed Studio XIAO ESP32-S3 Sense | Main controller and supported on-device voice recognition |
| Four compatible micro servos | Drive the robot’s leg movements |
| LiPo battery and suitable power connections | Supply portable electrical power |
| 3D-printed chassis and leg parts | Form the robot’s body and mechanical structure |
| Custom PCB or documented wiring arrangement | Connect the controller, servos, and power system |
| USB data cable | Program and debug the controller |
| Suitable fasteners and assembly tools | Secure the mechanical components |
3.1 The Seeed Studio XIAO ESP32-S3 Sense

The Seeed Studio XIAO ESP32-S3 Sense is the brain of this robotic pet. It is a small development board based on the ESP32-S3 platform, with wireless connectivity and hardware resources designed for embedded applications. Its Sense configuration includes a digital microphone and camera-related hardware, making it useful for projects involving voice interaction and other sensor-based features. The board family also supports interfaces such as GPIO, I²C, SPI, and UART, depending on the specific configuration and pin assignments.
In this project, the key feature is the ability to perform supported speech recognition locally using ESP-Skainet. The microphone captures sound, the recognition software processes it, and the firmware uses the recognized command to select an appropriate movement routine. That process creates a direct connection between your voice and the robot’s physical behavior.
One important detail: the project specifically identifies the XIAO ESP32-S3 Sense, not just any board carrying the ESP32 name. Different ESP32 variants have different processing capabilities, memory capacities, microphone support, and pin configurations. If you substitute another development board, you may need to change the firmware or hardware, and the original speech-recognition implementation may not work unchanged.
3.2 Micro Servos, Battery, and 3D-Printed Parts

The servos turn electronic instructions into physical movement. A servo receives a control signal and moves its output shaft toward a requested position within its operating range. By coordinating the positions of multiple servos, the robot can arrange its legs into different poses and perform programmed movement sequences.
The four micro servos in this build form part of its leg-actuation system. Their torque, operating voltage, dimensions, and movement range matter because the robot must support its own weight while moving. A servo that works well in a lightweight prototype may struggle if you add a heavier battery, thicker printed parts, or decorative accessories.
The 3D-printed structure provides the mounting points and mechanical links that connect the servos to the legs. You can manufacture these components with a desktop 3D printer, but print orientation, wall thickness, material selection, and assembly tolerances all influence durability. PLA can be suitable for an indoor prototype, although excessive heat, repeated mechanical stress, and weak layer orientation can cause problems.
The battery deserves just as much attention as the motors. Servos can draw substantial current when starting, changing direction, or resisting a load. Choose a power arrangement that meets the documented voltage and current requirements, and avoid powering multiple servos directly from a microcontroller’s 3.3 V output. The battery, wiring, and regulator must be appropriate for the complete system, not simply for the controller alone.
4. How Offline Voice Recognition Works
The voice-control feature is what separates this project from a conventional programmable walking toy. In a basic robot, you might press a button to trigger a movement. Here, the robot listens for supported speech patterns and uses the recognized command to determine what it should do next.
The process begins when the microphone captures sound. The firmware passes the audio through the configured recognition pipeline, which attempts to identify a supported wake word or command. Once a valid command has been detected, the application maps it to a programmed action. For example, a recognized instruction to sit can trigger a sequence of servo positions designed to lower the body into a sitting pose.
The project uses ESP-Skainet, an Espressif speech-recognition framework, for its on-device voice interaction. The published demonstration describes a workflow in which the robot listens for a wake word before accepting a command. This approach can operate without an internet connection for the supported local recognition functions, unlike voice assistants that require cloud processing.
That does not mean the robot understands every sentence like a human. Embedded voice recognition is generally constrained by its supported vocabulary, recognition models, microphone characteristics, and operating environment. A command such as “walk” may be recognized while a long, conversational instruction is not supported. Background music, loud fans, microphone placement, and unclear pronunciation can also affect reliability.
For makers, these limitations are part of the learning experience. You can test the robot in quiet and noisy environments, measure how consistently it recognizes commands, and explore improvements to the command workflow. The key lesson is that embedded AI does not have to mean a large language model running in the cloud. A small device can perform a useful, narrowly defined intelligent task locally.
5. How the Robot Dog Moves
A robot dog must coordinate its legs carefully if it is going to stand, walk, or change posture without falling over. The controller therefore needs more than a list of unrelated motor positions. It needs movement routines that define the order, timing, and target positions of the actuators.
For a simple action such as sitting, the firmware can move the servos through a predefined sequence until the robot reaches a stable pose. Walking is more complicated because the legs must move in a coordinated pattern. The timing of each leg’s movement influences balance, foot placement, and how smoothly the robot progresses across a surface.
A programmed quadruped can reproduce several recognizable behaviors without having the sophisticated balance control of a commercial autonomous robot. The Tech Talkies demonstration includes walking, sitting, lying down, stretching, dancing, and a response to “good boy.” These are examples of how a limited set of voice commands can trigger different motion routines.
It is useful to distinguish preprogrammed motion from autonomous locomotion. A robot executing a predefined walking sequence is following instructions written by its developer. A robot that detects obstacles, estimates its body position, adapts its gait to uneven terrain, and recovers from disturbances needs additional sensing and control logic. Do not assume that a voice-controlled robot automatically has all those capabilities.
This distinction also suggests several ways to improve the project. You could tune the gait timing, experiment with slower and faster movement patterns, or develop new poses. With appropriate additional sensors and control algorithms, you could investigate obstacle detection or feedback-based balance. Those upgrades require their own hardware and software work, but they turn a fun desktop robot into a more advanced robotics learning platform.
6. Software, Firmware, and Open-Source Code
Hardware is only half of the story. The firmware defines how the robot listens, interprets commands, and moves its legs. Without the right software, even a perfectly assembled robot will not respond as intended.
The source code for this project is published in the Tech Talkies YouTube repository. Its project directory is named 100 Pet Dog, making it straightforward to locate among the other maker projects. The repository provides the starting point for reviewing the project’s implementation and following the creator’s build instructions.
Project resources:
- GitHub source code: 100 Pet Dog
- Video walkthrough: Tech Talkies robot dog build
- XIAO ESP32-S3 documentation: Seeed Studio XIAO ESP32 series
6.1 Finding the Source Code and Preparing the Environment
Start by opening the GitHub project and reading the available README files, source files, wiring information, and assembly notes. Check which software framework and library versions the project expects before installing anything. This is especially important for speech-recognition projects because a compatible board definition, firmware configuration, and supported microphone interface may be necessary.
If the project provides a browser-based flasher, review its instructions and confirm that it supports your exact board before using it. The accompanying video description references a web flasher at techtalkies.github.io/flash.html. Follow the project’s current instructions rather than assuming every firmware version or board revision is interchangeable.
A sensible preparation workflow is to identify the board, inspect the required firmware files, install or open the recommended programming environment, and verify that your computer can communicate with the device over USB. If compilation is required, resolve missing libraries and configuration errors before connecting the servos. This makes it easier to separate software problems from wiring and power problems later.
Before flashing, save a copy of the original project files and record any changes you make. When something stops working, you can compare your modified version with the original implementation. This simple habit is valuable in any open-source hardware project, particularly when several software libraries and hardware components depend on one another.
7. Step-by-Step Guide to Building the Robot Dog
The most reliable way to reproduce the robot is to follow the original repository and video together. The video helps you understand the physical assembly, while the repository provides the implementation details needed to reproduce the electronics and firmware. The following workflow is a practical starting point; exact wiring, dimensions, and firmware settings must come from the project’s documentation.
7.1 Assembly, Wiring, and Power
Begin by gathering the documented parts and checking that the servos, printed components, battery, and controller match the design. Inspect the printed body and leg pieces for cracks, warped mounting holes, or rough edges that could interfere with movement. Assemble the mechanical structure carefully, ensuring that each servo is secured and its output shaft is connected correctly.
Next, prepare the electronics according to the original wiring diagram or custom PCB layout. Confirm the signal assignments and the power requirements of each component before applying power. The servos must receive a suitable supply, and the controller and servo system must share the appropriate signal reference where the design requires it. Never guess pin assignments based on another ESP32 robot, because different boards and firmware revisions can use different connections.
Before attaching the legs permanently, test the servos individually if the documentation allows it. Confirm their direction of travel and check that their mechanical linkages do not jam at the ends of the programmed movement range. Keep fingers clear of moving joints while testing, since even small servos can pinch skin or damage delicate printed components.
Finally, secure the battery and inspect all wiring for loose connections, exposed conductors, and possible shorts. A battery should not be crushed, punctured, or allowed to contact sharp moving parts. Stop immediately if you notice unusual heat, swelling, a burning smell, or repeated power resets.
7.2 Uploading Firmware and Testing Commands
Once the mechanical and electrical assembly is complete, connect the controller to your computer and follow the repository’s firmware instructions. Confirm that the correct board and software configuration are selected. If the project uses a browser flasher, follow its published procedure; if it requires compilation, build the firmware and resolve any reported errors before uploading.
After flashing, carry out the initial tests in stages. First, confirm that the board starts successfully and that the speech-recognition system initializes. Next, test the documented wake word and a simple supported command in a quiet room. Observe the response, then try the remaining commands individually rather than immediately attempting a long sequence of movements.
If the robot recognizes speech but does not move, investigate the servo power supply, signal wiring, and firmware configuration. If the servos move but commands are not recognized, inspect the microphone setup and speech-recognition initialization. If the robot resets when several servos move together, investigate voltage drops and current capacity instead of assuming the firmware is defective.
Once the individual behaviors work reliably, test the robot on a flat, uncluttered surface. Begin with short walking sequences and check whether the feet slip, the body tips, or any joints bind. This gradual process reduces the risk of damaging the printed structure while making it easier to diagnose problems.
8. What Can You Learn from This Project?
The project offers a practical introduction to embedded systems, robotics, and edge AI. You can study how a microcontroller receives input from a microphone, how firmware converts recognized commands into application events, and how those events control physical actuators. These concepts are relevant to interactive devices, educational robots, assistive technology prototypes, and many other embedded applications.
It also introduces the relationship between software and mechanical engineering. A movement sequence may be mathematically valid yet fail in practice because the body is too heavy, a linkage binds, or a servo cannot produce enough torque. Working through those problems teaches you to consider the complete system instead of treating code, electronics, and mechanics as separate worlds.
For electronics students, the build can become a useful portfolio project. Document the schematic, explain the command-processing flow, include photographs of the assembly, and describe the tests you performed. You can also record the limitations of the first version and show how subsequent changes improved its behavior. A clear engineering record demonstrates problem-solving skills far more effectively than a video of a robot moving without any explanation of how it works.
The project is also a good opportunity to explore open-source collaboration. You can read the existing implementation, compare your results with the documented behavior, and suggest improvements through the repository’s normal contribution process. Before redistributing modified files or selling a derivative design, review the repository’s license and any relevant component licenses. Publicly accessible source code does not automatically mean every form of reuse is unrestricted.
9. Challenges, Limitations, and Troubleshooting
A small robot dog can be rewarding to build, but it is still a real electromechanical system. Voice recognition may fail in noisy environments, servo motion may be inconsistent under load, and a poorly designed power supply can cause resets. Recognizing these limitations early helps you troubleshoot systematically instead of replacing components at random.
Voice-related issues should be investigated separately from motion-related issues. If the wake word is unreliable, test in a quiet environment, verify the microphone and firmware configuration, and use the exact supported commands. If recognition works but the robot does not execute the expected action, inspect the command-to-motion mapping in the firmware.
Mechanical problems require a different approach. Check that the legs are assembled in the correct orientation and that each servo moves freely through the intended range. Make sure fasteners are secure without overtightening the printed parts. If the robot struggles to stand, examine its weight distribution and servo torque requirements before trying to compensate with more aggressive movement commands.
Power problems deserve particular attention because multiple servos can draw significant current simultaneously. A controller that works perfectly over USB may behave differently once it operates from a battery while driving motors. Check supply voltage under load, use suitable wiring and regulation, and follow the battery manufacturer’s charging and handling instructions. Never bypass power protections just to keep the robot running.
Finally, remember that this is a compact maker project, not necessarily a robust all-weather robot. Dust, moisture, impact, and uneven surfaces can affect its reliability. Treat the initial version as an indoor prototype, supervise its movement, and make modifications only after understanding their effect on the complete system.
10. Ideas for Upgrading Your Robot Pet
After reproducing the original design, you can begin adding your own features. A simple first upgrade is to create additional movement routines, such as a greeting gesture or a different dance. This is a good way to learn servo control without changing the original hardware architecture.
Another possibility is to add visual feedback. The XIAO ESP32-S3 Sense platform includes camera-related capabilities, but using vision in a robot dog requires compatible software, appropriate processing resources, and a clear application design. You could investigate recognizing simple visual markers or detecting objects, provided you implement the necessary vision pipeline. These capabilities should be treated as optional extensions rather than features of the basic voice-controlled build.
You could also experiment with an OLED display or LED indicators to communicate the robot’s state. For example, the robot might indicate when it is listening, when a command has been recognized, or when its battery is low. Additional sensors could provide feedback about movement or nearby obstacles, although the necessary integration will depend on the available GPIO pins, power budget, and firmware architecture.
A more advanced project would use sensor feedback to improve walking stability. Instead of relying exclusively on predefined servo positions, you could investigate inertial measurement units, feedback-based control, and gait adjustments. This is a substantial step beyond adding another voice command, but it offers a valuable introduction to the challenges of building robots that respond to changing physical conditions.
The most important principle is to make one change at a time. Preserve a working baseline, document your modifications, and test each addition independently. That way, a failed experiment becomes useful information rather than a reason to rebuild the entire robot.
11. Is This Project Suitable for Beginners?
Yes, it can be a good project for beginners who are comfortable learning through experimentation. You do not need to design a complete robot from scratch if you use the existing source code, documented hardware, and assembly instructions. However, the project is more involved than a simple LED-blinking exercise because it combines mechanical assembly, servo control, power management, and speech-recognition software.
If you are new to microcontrollers, begin by learning how to connect the development board to your computer and run a basic example. Familiarize yourself with the board’s pinout, voltage requirements, and programming workflow before integrating the motors. Then move on to the original firmware and build the robot in small, testable stages.
Students can approach the project as a multidisciplinary learning exercise, while experienced makers can use it as a foundation for experimenting with embedded speech recognition and quadruped motion. You will get the most value from the build if you are willing to read documentation, inspect source code, and diagnose problems rather than expecting every component to work perfectly on the first attempt.
The final cost depends on the board, servos, battery, printed parts, and tools you already own. Check the original bill of materials and local component prices before budgeting. If you have access to a 3D printer and basic electronics equipment, you may already possess some of what you need.
12. Conclusion
The voice-controlled ESP32 robot dog by Tech Talkies is an engaging example of how accessible hardware and open-source software can bring modern robotics concepts into a home workshop. By combining the Seeed Studio XIAO ESP32-S3 Sense, on-device speech recognition, micro servos, and a 3D-printed structure, the project demonstrates how a small machine can listen for commands and respond with coordinated movement.
Its biggest strength is the opportunity to learn by building. You can explore embedded programming, voice recognition, actuator control, mechanical design, and power management in a single project. The open-source code also gives you a starting point for understanding the implementation and developing your own improvements.
The robot does not need to match an expensive commercial quadruped to be worthwhile. Its real value lies in showing how a collection of carefully integrated components can produce an interactive, programmable machine. Start with the documented design, test the hardware safely, and gradually add features as your skills develop.
Ready to build your own robotic companion? Watch the Tech Talkies video and explore the 100 Pet Dog GitHub repository. If you build your own version, share your improvements and inspire other makers to explore DIY robotics.
Frequently Asked Questions
1. What microcontroller does the voice-controlled robot dog use?
The project uses the Seeed Studio XIAO ESP32-S3 Sense, a compact development board with a digital microphone and support for embedded applications. The project uses ESP-Skainet for its on-device speech-recognition workflow.
2. Does the ESP32 robot dog need an internet connection?
The documented voice-control implementation can recognize its supported wake word and commands locally, without requiring a cloud connection for that speech-recognition process. Other features you add may require Wi-Fi or internet access, depending on how you implement them.
3. What actions can the robot dog perform?
The published demonstration describes commands for walking, sitting, lying down, stretching, dancing, and responding to “good boy.” The exact behavior depends on the firmware and the commands supported by the project.
4. Where can I download the robot dog’s source code?
You can find the project in the Tech Talkies GitHub repository. Read the accompanying documentation for the hardware requirements, assembly details, firmware setup, and any licensing conditions before building or modifying the design.
5. Can beginners build this DIY robot dog at home?
Yes, beginners can use the project as a learning platform, particularly if they have access to a 3D printer and basic electronics tools. Following the original instructions, checking the wiring carefully, and testing the servos before full assembly will make the process easier. Beginners should also pay attention to battery safety and the power requirements of the motors.